Table of Contents
- Generalities about the SonarQubeTM platform
- Installation, configuration and conventions
- Integration with Gitlab
- Carry on
- SonarQubeTM terminology
This document explains how to use the SonarQubeTM platform.
The goal of this user guide is mainly to:
- inform new users how to connect to our SonarQubeTM instance and publish analysis results,
- give some guidelines,
- give some pointers and mini tutorial concerning source code analysis in C/C++ and Python (section 3).
To know more about SonarQubeTM usage please refer to the official documentation of SonarQubeTM.
Here a course (in french) : Analyse continue.
Generalities about the SonarQubeTM platform
SonarQubeTM is mainly a web server providing some dashboards that help assessing the quality of programs. Many things can be reported: size of source code, detection of duplication, issues based on static and dynamic analyzers, coverage data, etc.
There exists different versions released: one is open source, free but with limited features and some others are charged, see Plans & Pricing. SonarCloudTM is a freely available instance of SonarQubeTM for open source projects. However it is charged for private projects.
After some experiments with the open source Community Edition version we have concluded that it meets requirements for most Inria usage. We host an instance on a virtual machine managed by the DSI and the SED of Inria.
Warning: this service is not meant to host risky confidential data (see intranet).
The url of the service is : https://sonarqube.inria.fr/sonarqube. This is a Community Edition LTS. Here is the list of plugins installed: Installed Plugins. To get more plugins installed please contact the support team. Languages that can be analyzed are: C#, CSS, CXX, Flex, Go, Groovy, HTML, JSP, Java, JavaScript, Kotlin, PHP, Python, Ruby, Rust, Scala, Shell, TypeScript, VB.NET, XML, YAML.
Without being logged only public projects are displayed. Any user is able to explore metrics and source code of public projects. This platform allows people with an Inria account to analyze their project. People with no Inria account will be able to join existing projects. Once logged users can:
- create a new project (only Inria account), being automatically administrator, through a sonar-scanner analysis
- join (browse metrics, see source code, administer issues, etc) existing project if proper permissions are given by one of the project's administrators
Here some rules to maintain the platform in a good health and to minimize the administrators work.
- security issue : token are created by users, the log are based on the users (tracked via the token), so the user who created the token is responsible for what can be done with the token.
- support channel : please use the propose support channel which is based on the Inria helpdesk mechanism. This helps the present and future administrator to build and share a knowledge base.
- clean up : please, respect the internal rule we decide about the project name (see below). This allows to maintain a smart view of the projects sent to the SonarQubeTM platform, and to avoid overlapped projects. We encourage also the user to clean up (delete) the projects which are not relevant anymore on the platform. In any case the administrators will clean up the platform by removing projects which are not alive (last analysis > 12 months).
Installation, configuration and conventions
The workflow to use SonarQubeTM and get quality measurement on a source code is the following:
- Analyze the source code on your computer. Tools such as clang static analyzer, cppcheck, gcovr, valgrind, pylint, pytest, etc may be used to produce reports. Then sonar-scanner will do its own analysis and collect reports of other tools.
- The same sonar-scanner will publish the results on the web server, the authentication can be done with a secret user's token.
We now present how to authenticate, generate the secret token and install the sonar-scanner program. Static and dynamic analysis of C/C++ and Python programs will be covered in the next section.
Create your account on the SonarQubeTM server
Sign in
- Inria members: login with Gitlab or use your LDAP login plus password
- Non Inria member: an Inria collaborator must introduce the
external user by sending an email to the support team with the
following information about the external user
- first name
- last name
Users that already have an account on Gitlab can use their gitlab's login and password to authenticate on SonarQubeTM. It will create a new SonarQubeTM's account at first login.
For those who already had an account (LDAP login) you can send an email to the support to ask for the change to gitlab's authentication.
In the email you have to give your Gitlab User ID (on your profile page in user settings) so that we can convert the account in updating the postgresql sonarqube database, e.g. gitlab login jdoe, gitlab id 42, sonarqube login doe-john33400:
psql -U sonarqube
UPDATE users SET external_login = 'jdoe' WHERE login = 'doe-john33400';
UPDATE users SET external_id = '42' WHERE login = 'doe-john33400';
\q
Create a token
- When logged in, go to "My account" (top right)
- Select the Security tab
- Generate a token
- Copy the generated token (a 40 letters key) and store it
This token will be useful to authenticate to the instance replacing authentication with the login/password pair. It will be used with sonar-scanner to publish results on a project. Notice the token is per user, not per project. It is not meant to be shared between users. Of course to automatize analysis in a CI (continuous integration) process one token will be used on some machines shared by administrators of the CI. Try to be serious and keep it safe.
If you import the project from Gitlab you don't need to use your personnal token, you will instead create a project's token.
Install sonar-scanner on your local machine
The sonar-scanner program allows you to:
- index files,
- perform static analysis on them (size, duplication, look for issues)
- collect reports coming from other analysis tools such as Clang Static Analyzer, cppcheck, gcovr, rats, valgrind (what can be imported depends mainly on the SonarQubeTM plugins installed and used, see sonar-cxx for example),
- publish data on the SonarQubeTM server:
- if the project does not exist yet, a new one is automatically created,
- the publisher (token's owner) becomes its administrator,
- what identified a unique project is the "sonar.projectKey"
property, see
sonar-project.propertiesfile later.
NB: the following installation steps are valid for a Linux Debian operating system. Please find the appropriate equivalent steps for your OS if different and visit the sonar-scanner main page.
Download
- Download the sonar-scanner program available here
- Or look for another version here, notice we do not guarantee the sanity of these other versions!
- Unzip where you would like the package to be
You may add sonar-scanner-VERSION/bin in your PATH environment
wget https://binaries.sonarsource.com/Distribution/sonar-scanner-cli/sonar-scanner-cli-6.2.1.4610-linux-x64.zip
unzip sonar-scanner-cli-6.2.1.4610-linux-x64.zip
export PATH=$PWD/sonar-scanner-6.2.1.4610-linux-x64/bin:$PATH
And voilà!
The connection with the server will be established with https protocol to submit results so that a certificate must be set.
Tip for Mac OS: prefer the brew package
Inria's trusted SSL Certificate (optional)
Download the file digicertca.crt or ask the support to get it. Then the certificate must be added to the keystore of the java environment used by sonar-scanner
# we consider sonar-scanner installed in SONAR_ROOT
keytool -import -alias inria -storepass "changeit" -keystore $SONAR_ROOT/jre/lib/security/cacerts -file digicertca.crt
Configure the sonar-scanner properties file (optional)
If SonarQubeTM is the only instance you will use then you should certainly tell your sonar-scanner program to publish exclusively on this web server.
- Configure the sonar-scanner.properties file located in
$SONAR_ROOT/confby setting the url as follows:#sonar.host.url=http://localhost:9000 sonar.host.url=https://sonarqube.inria.fr/sonarqube- Notice this property can be specified per project, in the sonar-project.properties file, see the next section
One can also use the environment variable SONAR_HOST_URL to set this property.
Run sonar-scanner on your code
Configure the project properties file
- Create the properties file in the root of your source code
cd CODE_SRC; touch sonar-project.properties- Fill this file with some appropriate values, a more complete list of parameters (without considering plugins) is available here.
| Property Name | Definition | Mandatory | Examples |
|---|---|---|---|
| sonar.host.url | url of the server | no (can set SONAR_HOST_URL) | https://sonarqube.inria.fr/sonarqube |
| sonar.login | user's or project's token | no (can set SONAR_TOKEN) | squ_e1d93e9a6a0e09689c59ccc9fcfdc0893c42baf0 |
| sonar.projectKey | project's key/name | yes | team:project:dev, team:project:release:2.0 |
| sonar.projectName | project's name | no | same as key |
| sonar.projectVersion | see defining new code | no | 1.0, 2.2, etc |
| sonar.sources | paths to sources | yes | ., ./build |
- sonar.login: the token we have generated before once logged-in or the project's token generated during the Gitlab project's importation.
One can also use the environment variable
SONAR_TOKENto set this property. Do not git commit this token and mask the variable during CI pipelines cf. Gitlab documentation. -
sonar.projectKey: identified the project on SonarQubeTM (must be unique on the instance). If you import the project from Gitlab the project's key will be given in the process. If the project is directly created by a user (during the first sonar-scanner analysis) we ask to respect a format in order to avoid projects being lost or overwritten. The key can begins as follows "name of the inria team:name of the project", e.g. tadaam:hwloc.
In case of multi-teams projects, the following rule may be applied :
- if the project is developed by teams located in an unique center, the 3-digits center name (bso, gra, lne, nge, par, rba, sam, sif) is used as prefix (e.g. bso:aerosol)
- if the project is developed by teams spread in several centers, inria is used as prefix (e.g. inria:medinria)
-
sonar.projectName: please don't set it, the name will be the sonar.projectKey
Example template of sonar-project.properties
# url of the SonarQube<sup>TM</sup> server
sonar.host.url=https://sonarqube.inria.fr/sonarqube
# login/password mechanism required to transmit the analysis to the SonarQube<sup>TM</sup> server (password must be left empty with the token usage)
sonar.login=squ_e1d93e9a6a0e09689c59ccc9fcfdc0893c42baf0
# must be unique in a given SonarQube<sup>TM</sup> instance
sonar.projectKey=sedbso:heat
# to add a link to the homepage
sonar.links.homepage=https://gitlab.inria.fr/sed-bso/heat
# to add a link to the homepage
sonar.links.scm=https://gitlab.inria.fr/sed-bso/heat.git
# small description of the project
sonar.projectDescription=Solve the heat propagation equation
# used to compare metrics with v1.0 for example
sonar.projectVersion=2.0
# to get git blame information such as the commit author line by line
sonar.scm.disabled=false
sonar.scm.provider=git
sonar.sourceEncoding=UTF-8
# Path is relative to the sonar-project.properties file. Replace "\" by "/" on Windows.
sonar.sources=.
# exclude some files from being analyzed
sonar.exclusions=build/CMakeFiles/**,cmake_modules/**,doc/**,formation/**,tools/**,**/*.html,**/*.xml,**/*.css
# exclude some files from being counted in the coverage
sonar.coverage.exclusions=Dockerfile,test_heat_plot.py
# to give precise information about compilation commands (paths to headers, preprocessor definitions, etc)
sonar.cxx.jsonCompilationDatabase=build/compile_commands.json
# clarify what is c and c++ files
sonar.cxx.file.suffixes=.h,.c # https://github.com/SonarOpenCommunity/sonar-cxx/wiki/sonar.cxx.file.suffixes
sonar.cxx.errorRecoveryEnabled=true
sonar.cxx.includeDirectories=/usr/lib/gcc/x86_64-linux-gnu/9/include,/usr/local/include,/usr/include/x86_64-linux-gnu,/usr/include,/usr/lib/x86_64-linux-gnu/openmpi/include,include,.
sonar.cxx.gcc.encoding=UTF-8
sonar.cxx.gcc.regex=(?<file>.*):(?<line>[0-9]+):[0-9]+:\\\x20warning:\\\x20(?<message>.*)\\\x20\\\[(?<id>.*)\\\]
sonar.cxx.gcc.reportPaths=build/heat-build.log
sonar.cxx.clangsa.reportPaths=build/analyzer_reports/*/*.plist
sonar.cxx.clangtidy.reportPaths=clang-tidy-report
sonar.cxx.cppcheck.reportPaths=heat-cppcheck.xml
sonar.cxx.rats.reportPaths=heat-rats.xml
sonar.cxx.vera.reportPaths=heat-vera.xml
sonar.cxx.valgrind.reportPaths=heat-valgrind.xml
sonar.cxx.xunit.reportPaths=report.xml
sonar.cxx.cobertura.reportPaths=coverage.xml
sonar.python.xunit.reportPath=plot_junit.xml
sonar.python.coverage.reportPaths=plot_coverage.xml
Run sonar-scanner
cd CODE_SRC; sonar-scanner
You should get at the end
INFO: EXECUTION SUCCESS
Some properties can also be directly given to sonar-scanner
sonar-scanner -X -Dsonar.host.url=https://sonarqube.inria.fr/sonarqube -Dsonar.login=THE_TOKEN_YOU_GET
-X flag is used to get DEBUG information.
Explore the results
Log in using your login/password
Navigate through the analysis elements
You can explore:
- codes you administer,
- public codes,
- and have access to some global metrics of all analyzed programs (public and private).
Permissions on projects, become administrator
By default, you don't have access to the source of the private codes (obvious). The way to control who can see the source code, have access to issues, etc, is to be administrator of the project. By default it is the user who performs and submits the first analysis of a project who becomes its administrator. To get permission grants on a project, ask to one existing administrators or send an email to the support with the following information : project name (key) and the permissions granted for each user. Permissions list is the following: Browse, See Source Code, Administer Issues, Administer, Execute Analysis. Example
- Subject: PROJECT_NAME project permissions
- Body:
- user1: Browse, See Source Code
- user2: Browse, See Source Code, Administer Issues, Administer, Execute Analysis
Visibility of your project
By default new projects visibility is set to Private such that anyone is not able to see your project and authenticate users only see general metrics and not the source code. To make your project public you have to be administrator of the project and go to the Administration panel of your project, select Permissions and select the "Public" button. Once public your code source and issues will be visible from anyone.
Manage issues (Quality Profile)
The Quality profile (QP) in SonarQubeTM is used to manage rules that will be considered when uploading the reports sent by sonar-scanner. It is possible to activate/deactivate issues in a specific QP and associate this QP to some projects.
By default the QP used is "Sonar Way", a default configuration given by SonarQubeTM. All existing rules are not activated. We have created an "Inria" QP with the maximum number of rules activated and it is used by default.
The administrators of a project can change the QP associated with their project. On the other hand they are not allowed to create new QPs. To get a new QP, users will have to send an email to the support with the following information
- Subject: QP administration
- Body: the following people (with an SonarQubeTM account) can administer the QP of the C project team:project_name (e.g.: tadaam:hwloc) : user1, user2
Then these users will be able to manage issues that are activated or not and can associate projects they administer with this new QP.
For instance a specific pattern may be checked for license header. The default SonarQubeTM pattern can be changed to your regular expression (set isRegularExpression to true), e.g.
/\*\*.+\* @file.+\* @copyright Copyright \(c\) [0-9]{4}, Inria.+\* @author Inria SED Bordeaux
The Quality gates can also be created and modified, do not hesitate to ask the support.
Integration with Gitlab
Thanks to the SonarQube community branch plugin we can get SonarQubeTM's analysis on different branches and "pull requests" i.e. "merge requests".
This means that when sonar-scanner is called in a CI/CD Gitlab's job (with git blame information available, set GIT_DEPTH to 0) SonarQubeTM is able to automatically detect if it is in a push branch pipeline or merge request one and publish the report on a related panel on SonarQubeTM.
In addition, if the Gitlab's project has been imported (see below), SonarQubeTM can publish on Gitlab's merge requests some comments on new lines of code concerned by new issues.
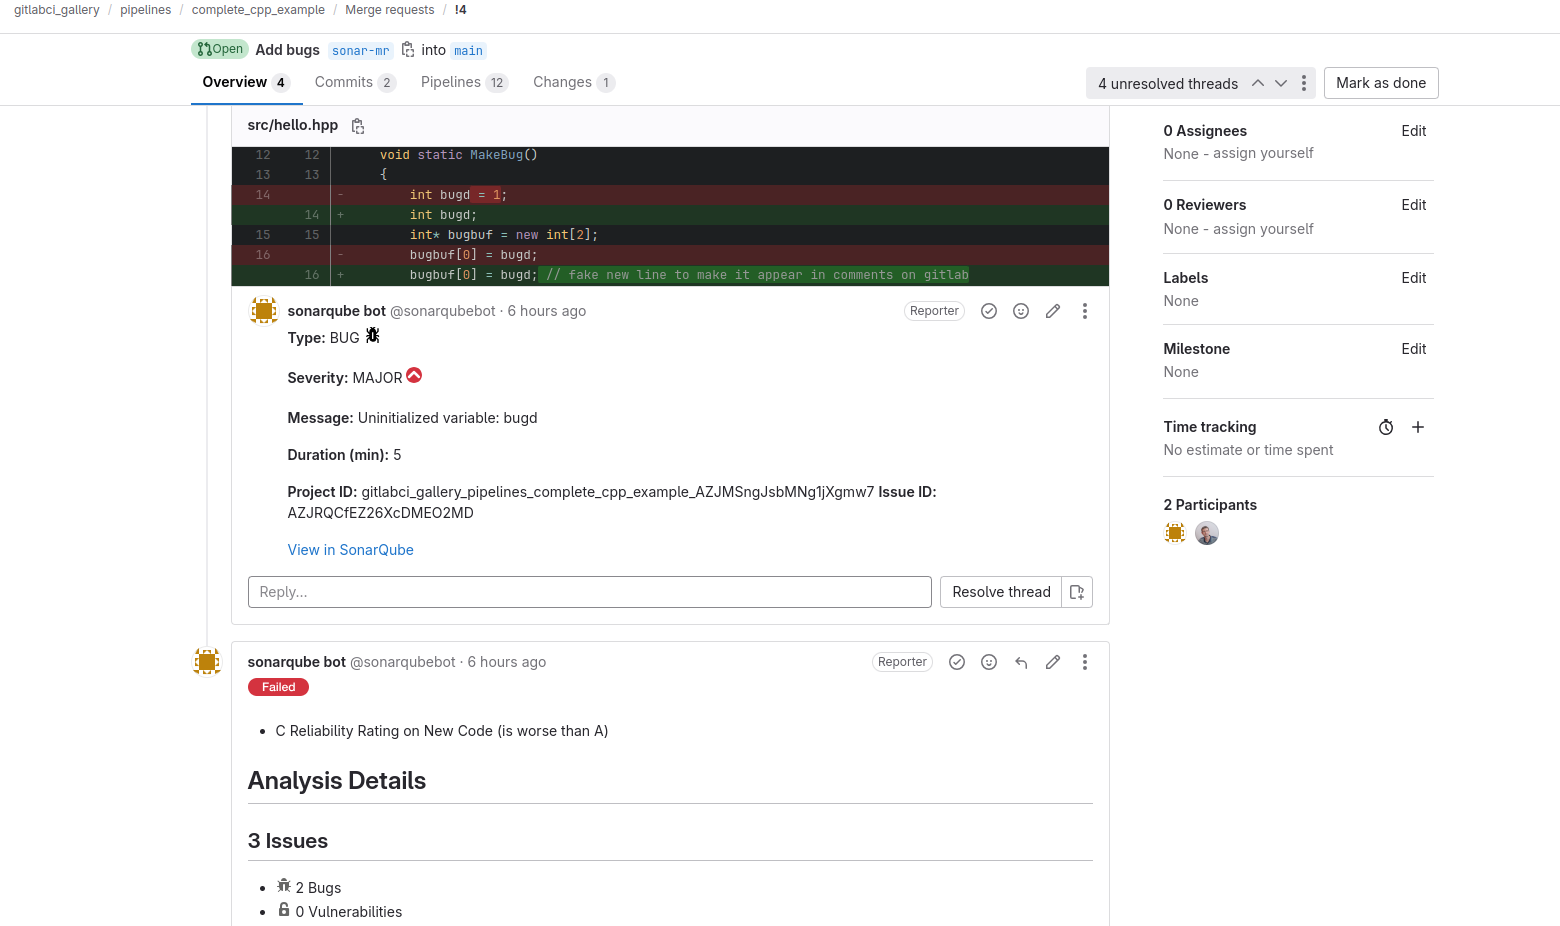
SonarQubeTM comments on a merge request |
To configure your Gitlab's project into SonarQubeTM proceed as follows:
1) On Gitlab, create a new personnal access token with read_api scope, so that your SonarQubeTM's account get access to your Gitlab's projects. On the main SonarQubeTM project's page, click on the "Create Project" button (top right) and give your personnal access token.
2) On SonarQubeTM, import your project : button Create Project -> Gitlab -> choose your project in the list -> Set up. Choose the CI method, With Gitlab CI or Other CI:
-
"Set your project key" : copy the key (unique id) of the SonarQubeTM's project. Copy/paste the parameters in the sonar-project.properties, example
sonar.projectKey=foo_bar_AZJMSngJsbMNg1jXgmw7 sonar.qualitygate.wait=true -
"Add environment variables" : click on "Generate a token" so that sonar-scanner in Gitlab CI job can send reports to SonarQubeTM. To do so, add the two following environment variables in the Gitlab project -> Settings -> CI/CD, Variables -> Add variable, example:
- SONAR_HOST_URL : https://sonarqube.inria.fr/sonarqube
- SONAR_TOKEN : sqp_d16de341af4ae57573f2a761ae6d705a3db049f7 (i.e. the SonarQubeTM's project token newly created).
3) On Gitlab, add the sonarqubebot user with Reporter access level on your project.
4) Execute a Gitlab's pipeline containing sonar-scanner analysis from a "push branch" or "merge request" event. If the Quality Gate gives a "Passed" status then the job is in success, else it fails (cf. sonar.qualitygate.wait=true).
To get the SonarQubeTM report into a merge request
1) Add the proper rule to your job (in .gitlab-ci.yml) so that Gitlab triggers a "merge request pipeline":
    rules:
      - if: $CI_PIPELINE_SOURCE == "merge_request_event"
This will automatically add a summary of new issues and coverage with links to SonarQubeTM in the Overview panel of the merge request.
2) Add the environment variable GIT_DEPTH=0 in your job (in .gitlab-ci.yml) to get git blame information and ensure sonarqubebot will be able to publish comments on the new lines impacted by "issues":
    variables:
      GIT_DEPTH: "0"
3) On SonarQubeTM, change the default New Code definition: in your project settings, go to New Code and click on Define a specific setting for this project, Reference branch, choose your target default branch (e.g. master or main), save. Just below, you can set the new code definition on you main branch, e.g. click on Actions, Edit, Previous version (new code since the last release).
Warning: execute some analysis first on your main branches (e.g. 'main' or 'master') before trying to execute analysis on merge requests and development branches. This, to be able to compare the development branch (with new code) with the main one and get a meaningful Quality Gate.
Project example on Gitlab: complete_cpp_example. See MR 4.
Carry on
We detail here how to use existing tools to analyze C/C++ and Python projects. The goal here is neither to rewrite the documentation about analysis tools nor to replace SonarQubeTM plugins ones. We will give useful pointers and some usage examples. It is not meant to be exhaustive. Please refer to the appropriate existing documentation to go further. Notice that we aim at analyzing mainly C/C++ and Python source code (our use cases) so that we focus on analysis tools that are compatible with the SonarQubeTM plugins. To get more information about plugins please read
- sonar-cxx Wiki : for the C/C++ plugin, and more specifically the Running tools section
- SonarPython : for the Python plugin
- See All Plugins : for other plugins and languages
We sum up here some analysis tools that can be used with the associated languages
| Tool | Analysis Type | Languages |
|---|---|---|
| cppcheck | static | C/C++ |
| clang-sa | static | C/C++ |
| RATS | static | C/C++ |
| vera++ | static | C/C++ |
| GCOV | dynamic | C/C++ |
| Valgrind | dynamic | C/C++ |
| Pylint | static | Python |
| pytest(-cov) | dynamic | Python |
Install tools if needed (may already exist on your system)
We give installation instructions for analysis tools that are considered in the next section.
Install Debian packages
sudo apt install -y git subversion mercurial
sudo apt install -y build-essential gfortran clang python3 python3-pip
sudo apt install -y gcovr lcov cppcheck vera++ valgrind libexpat1-dev
pip install --upgrade pip
sudo pip install pytest pytest-cov coverage scan-build
Additional analysis tools installation for C/C++ code (optional)
-
RATS
version_rats=2.4 wget https://storage.googleapis.com/google-code-archive-downloads/v2/code.google.com/rough-auditing-tool-for-security/rats-${version_rats}.tgz tar -xzvf rats-${version_rats}.tgz cd rats-${version_rats} ./configure && make && sudo make install -
Gcov
Gcov is distributed directly with GCC (for example with the Debian package build-essential)
sudo apt install -y gcovr lcovThere are at least two ways to produce an xml output which is compatible with SonarQubeTM:
- using gcovr : http://gcovr.com/guide.html
- or if you prefer to use lcov :
http://ltp.sourceforge.net/coverage/lcov.php, there is a tool
to convert lcov output to cobertura-xml (SonarQubeTM
compatible) : https://github.com/eriwen/lcov-to-cobertura-xml
wget https://github.com/eriwen/lcov-to-cobertura-xml/archive/1.6.tar.gz
tar xvf 1.6.tar.gz
-
Dr. Memory
version_drmemory=1.11.0-2
echo 'export version_drmemory=1.11.0-2' >> ~/.bashrc
sudo apt install -y g++-multilib
wget https://github.com/DynamoRIO/drmemory/releases/download/release_1.11.0/DrMemory-Linux-${version_drmemory}.tar.gz
tar xvf DrMemory-Linux-${version_drmemory}.tar.gz
cd DrMemory-Linux-${version_drmemory}/bin
export PATH=$PWD:$PATH
echo 'export PATH=/home/ci/DrMemory-Linux-${version_drmemory}/bin:$PATH' >> ~/.bashrc
Execute analysis
Here are usage example of some analysis tools. Once again to see a complete list of possibilities, users should refer to the existing documentations
- sonar-cxx Wiki : for the C/C++ plugin, and more specifically the Running tools section
- SonarPython : for the Python plugin
- See All Plugins : for other plugins and languages
cppcheck
Cppcheck is an analysis tool for C/C++ code. Unlike C/C++ compilers and many other analysis tools, it doesn't detect syntax errors. Instead, Cppcheck detects the types of bugs that the compilers normally fail to detect. The goal is no false positives.
Run cppcheck generating a SonarQubeTM compatible output. Note that the result is dumped in the error output.
cd CODE_SRC
export CPPCHECK_INCLUDES="-Iinclude"
export SOURCES_TO_ANALYZE="src tests utils"
export SOURCES_TO_EXCLUDE="-isrc/beta"
export DEFINITIONS=`grep "^#define" config.log | sed -e "s#\#define #-D#g" | sed -e "s# #=#g" | xargs`
cppcheck -v -f --language=c++ --platform=unix64 --enable=all --xml --xml-version=2 --suppress=missingIncludeSystem ${DEFINITIONS} ${CPPCHECK_INCLUDES} ${SOURCES_TO_EXCLUDE} ${SOURCES_TO_ANALYZE} 2> cppcheck.xml
Parameters:
- v : verbose
- f : force to check all configurations (all combination of definitions/object-like macros)
- enable=all : enable all kind of cppcheck errors, warning, performance, information, style
- suppress : suppress some specific errors, see
cppcheck
          --errorlist
to get the list - -D : definitions/object-like macros
- -I : add include directories to look for headers
- -i : to exclude some source directories
Add the cppcheck output file inside the sonar-project.properties
file of your project
sonar.cxx.cppcheck.reportPaths=cppcheck.xml
For C project (and not C++) you should replace sonar.cxx by sonar.c.
During the sonar-scanner analysis, you should observe something like the following
INFO: Sensor CxxCppCheckSensor (wrapped)
INFO: Searching reports by relative path with basedir '/home/ci/hpclib/scan/scan_build/starpu-1.2.0' and search prop 'sonar.cxx.cppcheck.reportPaths'
INFO: Scanner found '1' report files
INFO: Parser will parse '1' report files
INFO: Processing report '/home/ci/hpclib/scan/scan_build/starpu-1.2.0/starpu-cppcheck.xml'
INFO: Added report '/home/ci/hpclib/scan/scan_build/starpu-1.2.0/starpu-cppcheck.xml' (parsed by: CppcheckParserV2)
INFO: CppCheck Errors processed = 15760
Clang SA
The Clang Static Analyzer is a source code analysis tool that finds bugs in C, C++, and Objective-C programs.
You should have the Python program scan-build installed, use it before your make command
scan-build -plist --intercept-first --analyze-headers -o analyzer_reports make
Add the path to reports in sonar-project.properties
sonar.cxx.clangsa.reportPaths=analyzer_reports/*/*.plist
During the sonar-scanner analysis, you should observe something like the following
INFO: Sensor CXX Clang-Tidy report import [cxx] (done) | time=2ms
INFO: Sensor CXX Clang Static Analyzer report import [cxx] (done)
INFO: Searching reports by relative path with basedir '/home/gitlab-runner/builds/7cb15692/0/sed-bso/heat' and search prop 'sonar.cxx.clangsa.reportPaths'
INFO: Scanner found '5' report files
INFO: Parser will parse '5' report files
INFO: Processing report '/home/gitlab-runner/builds/7cb15692/0/sed-bso/heat/build/analyzer_reports/scan-build-2018-02-01-12-37-21-377840-Ouvcnk/report-HU5PQ8.plist'
INFO: Processing report '/home/gitlab-runner/builds/7cb15692/0/sed-bso/heat/build/analyzer_reports/scan-build-2018-02-01-12-37-21-377840-Ouvcnk/report-LHW7sT.plist'
INFO: Processing report '/home/gitlab-runner/builds/7cb15692/0/sed-bso/heat/build/analyzer_reports/scan-build-2018-02-01-12-37-21-377840-Ouvcnk/report-S6r5Ym.plist'
INFO: Processing report '/home/gitlab-runner/builds/7cb15692/0/sed-bso/heat/build/analyzer_reports/scan-build-2018-02-01-12-37-21-377840-Ouvcnk/report-VtZcxV.plist'
INFO: Processing report '/home/gitlab-runner/builds/7cb15692/0/sed-bso/heat/build/analyzer_reports/scan-build-2018-02-01-12-37-21-377840-Ouvcnk/report-rdY0BL.plist'
INFO: C-CLANGSA processed = 1
RATS
Rough Auditing Tool for Security, see https://security.web.cern.ch/security/recommendations/en/codetools/rats.shtml
export SOURCES_TO_ANALYZE="src"
rats -w 3 --xml ${SOURCES_TO_ANALYZE} > rats.xml
-w 3 stands for the warning level (<1,2,3>)
Add the rats output file inside the sonar-project.properties file
of your project
sonar.cxx.rats.reportPaths=rats.xml
For C project (and not C++) you should replace sonar.cxx by sonar.c.
During the sonar-scanner analysis, you should observe something like the following
INFO: Sensor CxxRatsSensor (wrapped)
INFO: Searching reports by relative path with basedir '/home/ci/hpclib/scan/scan_build/starpu-1.2.0' and search prop 'sonar.cxx.rats.reportPaths'
INFO: Scanner found '1' report files
INFO: Parser will parse '1' report files
INFO: Processing report '/home/ci/hpclib/scan/scan_build/starpu-1.2.0/starpu-rats.xml'
INFO: RATS issues processed = 894
Vera++
Vera++ is a programmable tool for verification, analysis and transformation of C++ source code, see https://bitbucket.org/verateam/vera/wiki/Home.
This program raises mainly stylistic issues which improve the clarity and the readability of C/C++ codes, cf. https://bitbucket.org/verateam/vera/wiki/Rules. Use it or not use it is a matter of preference. It is just good to know that it exists.
# download sources of the sonar-cxx plugin: a script inside the
# project allows to convert vera++ output to an xml report
cd ~
git clone https://github.com/SonarOpenCommunity/sonar-cxx.git
# process the analysis
export SOURCES_TO_ANALYZE="src"
bash -c 'find ${SOURCES_TO_ANALYZE} -regex ".*\.c\|.*\.h" | vera++ - -showrules -nodup |& ~/sonar-cxx/sonar-cxx-plugin/src/tools/vera++Report2checkstyleReport.perl > vera.xml'
Add the vera++ output file inside the sonar-project.properties
file of your project
sonar.cxx.vera.reportPaths=vera.xml
For C project (and not C++) you should replace sonar.cxx by sonar.c.
During the sonar-scanner analysis, you should observe something like the following
INFO: Sensor CxxVeraxxSensor
INFO: Searching reports by relative path with basedir '/home/ci/hpclib/scan/scan_build/hwloc-1.11.6' and search prop 'sonar.cxx.vera.reportPaths'
INFO: Scanner found '1' report files
INFO: Parser will parse '1' report files
INFO: Processing report '/home/ci/hpclib/scan/scan_build/hwloc-1.11.6/vera.xml'
INFO: Vera++ rule violations processed = 12411
Gcov
gcov is a tool you can use in conjunction with GCC to test code coverage in your programs.
- https://gcc.gnu.org/onlinedocs/gcc/Gcov.html
- https://github.com/SonarOpenCommunity/sonar-cxx/wiki/Coverage-tracers
First you need to add the flag –coverage to the GCC compiler flags (we recommend some others) and to the linker flags
make clean
export CFLAGS="-O0 -g -fPIC --coverage -Wall"
export LDFLAGS="--coverage"
$PWD/configure
make V=1
Execute your tests
make check
Some .gcno and .gcda files should be created in the different build directories.
It is now time to collect the data and generate the report file
-
using gcovr
# gcov files are created by default at the level of object # files. To help SonarQube<sup>TM</sup> to retrieve the good paths it may # be needed to move gcov files at the same level as sources mv tests/ports/.libs/*.gcno tests/ports/ mv src/.libs/*.gcno src/ mv src/.libs/*.gcda src/ # collect the data and generate the report gcovr -r . --xml > gcov.xml -
using lcov
# gcov files are created by default at the level of object
# files. To help SonarQube<sup>TM</sup> to retrieve the good paths it may
# be needed to move gcov files at the same level as sources
mv tests/ports/.libs/*.gcno tests/ports/
mv src/.libs/*.gcno src/
mv src/.libs/*.gcda src/
# collect the coverage data
lcov --directory . --capture --output-file project.lcov
# generate the classical html lcov page that can be published
# on the web
genhtml -o coverage project.lcov
# convert the lcov report to an xml format convertible with
# SonarQube<sup>TM</sup>. The python script lcov_cobertura.py, see
# https://github.com/eriwen/lcov-to-cobertura-xml, is required
lcov_cobertura.py project.lcov --output gcov.xml
Add the gcov output file inside the sonar-project.properties file
of your project
sonar.cxx.cobertura.reportPaths=gcov.xml
For C project (and not C++) you should replace sonar.cxx by sonar.c.
During the sonar-scanner analysis, you should observe the following
DEBUG: Parsing coverage reports
DEBUG: Normalized report includes to '[/home/ci/hpclib/scan/scan_build/hwloc-1.11.6/hwloc-coverage.xml]'
INFO: Scanner found '1' report files
INFO: Parser will parse '1' report files
DEBUG: Parsing 'Cobertura' format
INFO: Added report '/home/ci/hpclib/scan/scan_build/hwloc-1.11.6/hwloc-coverage.xml' (parsed by: CoberturaParser) to the coverage data
DEBUG: cached measures for '/home/ci/hpclib/scan/scan_build/hwloc-1.11.6/hwloc-coverage.xml' : current cache content data = '0'
DEBUG: Saving '64' coverage measures for file '/home/ci/hpclib_fp/scan/scan_build/hwloc-1.11.6/tests/hwloc_groups.c'
...
Valgrind
Valgrind is an instrumentation framework for building dynamic analysis tools. There are Valgrind tools that can automatically detect many memory management and threading bugs, and profile your programs in detail. See http://valgrind.org/.
-
first you need to enable debug information with the flag -g and add also -fno-inline for C++ apps.
make clean export CFLAGS="-O0 -g -fPIC --coverage -Wall -fno-inline" $PWD/configure make V=1 -
call valgrind as usual and dump the result using the xml format
valgrind --xml=yes --xml-file=valgrind.xml ./myapp args_to_myapp -
add the valgrind output file inside the
sonar-project.propertiesfile of your projectsonar.cxx.valgrind.reportPaths=valgrind.xmlFor C project (and not C++) you should replace sonar.cxx by sonar.c. - during the sonar-scanner analysis, you should observe something like the following
INFO: Sensor CxxValgrindSensor
INFO: Searching reports by relative path with basedir '/home/ci/tests/c_examples/leak_test' and search prop 'sonar.cxx.valgrind.reportPaths'
INFO: Scanner found '1' report files
INFO: Parser will parse '1' report files
INFO: Processing report '/home/ci/tests/c_examples/leak_test/valgrind.xml'
INFO: Valgrind errors processed = 1
The case of MPI applications: to avoid many false positive try using the suppression files that are distributed with MPI, for example for OpenMPI
export OPENMPI_DIR=path/to/mpi
$OPENMPI_DIR/bin/mpirun "-np" "4" valgrind --xml=yes --xml-file=valgrind.xml --suppressions=$OPENMPI_DIR/share/openmpi/openmpi-valgrind.supp ./myapp args_to_myapp
Python tools
-
Python tests and coverage
# generate the test and coverage reports coverage run -m pytest --junit-xml=test.xml coverage report coverage xml -
SonarQubeTM config file
The
sonar-project.propertiesfilesonar.sources=pylife.py,tests/test_pylife.py sonar.sourceEncoding=UTF-8 sonar.python.xunit.reportPath=test.xml sonar.python.coverage.reportPaths=coverage.xml
Adding information about your project
Insert your project information (links) in the project properties file
# links that will be displayed by icons within the SonarQube<sup>TM</sup> dashboard
sonar.links.homepage=THE_MAIN_ENTRY_OF_THE_CODE
sonar.links.scm=THE_SCM_PROJECT_LINK
sonar.links.ci=THE_CI_PROJECT_CI
sonar.links.issue=THE_PROJECT_BUG_TRACKER
SonarQubeTM terminology
Most of the following lines are extracted from the online documentations (https://www.sonarqube.com, https://docs.sonarqube.org/latest/user-guide/metric-definitions/)
- The Rules, issues, technical debt chain: in the SonarQubeTM platform, plugins contribute rules which are executed on source code to generate issues. Those issues are used to compute remediation cost and technical debt.
- Rules:
- There are three basic types of rules: Reliability, Maintainability and Security rules.
- For instance, over 3700 rules used for C/C++ languages and 240 for Python
- Bugs track code that is demonstrably wrong or highly likely to yield unexpected behavior. (Reliability)
- Vulnerabilities are raised on code that is potentially vulnerable to exploitation by hackers. (Security)
- Code Smells will confuse maintainers or give them pause. They are measured primarily in terms of the time they will take to fix. (Maintainability)
- Issues: Each issue has one of five severities:
- BLOCKER: Bug with a high probability to impact the behavior of the application in production: memory leak, unclosed JDBC connection, …. The code MUST be immediately fixed.
- CRITICAL: Either a bug with a low probability to impact the behavior of the application in production or an issue which represents a security flaw: empty catch block, SQL injection, … The code MUST be immediately reviewed.
- MAJOR: Quality flaw which can highly impact the developer productivity: uncovered piece of code, duplicated blocks, unused parameters, …
- MINOR: Quality flaw which can slightly impact the developer productivity: lines should not be too long, "switch" statements should have at least 3 cases, …
- INFO: Neither a bug nor a quality flaw, just a finding.
- technical debt: it implements the SQALE method
- Complexity:
- https://docs.sonarqube.org/latest/user-guide/metric-definitions/
- It is the complexity calculated based on the number of paths through the code. Whenever the control flow of a function splits, the complexity counter gets incremented by one. Each function has a minimum complexity of 1. This calculation varies slightly by language because keywords and functionalities do.
- The Quality Gate implementation is by default : never fails. One can change this by asking to administers to create a specific Quality Gate.